Web Programming
Lecture 9

Web application architectures
and introduction to node.js

Josue Obregon

Seoul National University of Science and Technology
Information Technology Management
Lecture slides index

May 13, 2025

Agenda

  • Web applications architecture
  • Web service
  • Server-side web frameworks
  • Node.js
  • Starting a simple Node.js project

Course structure

Roadmaps: Frontend, backend and fullstack

What we have learned so far

  • Web page structure and appearance with HTML5 and CSS.
  • Client-side interactivity with JS DOM and events.
  • Using web services (APIs) as a client with JS.
  • Writing JSON-based web services with a server-side language.

Core layers of a web application

  • Presentation Layer (Frontend)

    • What users see and interact with (UI)
    • Built with HTML, CSS, JavaScript (or frameworks like React, Angular)
  • Application Layer (Backend / Business Logic)

    • Processes user requests, applies business rules
    • Handles authentication, routing, and service orchestration
    • Many languages and framework available (Node.js, Django, Laravel, etc.)
  • Data Layer (Database)

    • Stores, retrieves, and manages application data
    • Can be relational (MySQL, PostgreSQL) or NoSQL (MongoDB, Redis)

Web application architecture?

  • The structure that defines how web components —frontend, backend, and database— interact to deliver a complete web application.
    • Ensure scalability, maintainability, and performance
    • Support modularity and evolution of applications
  • Evolution of web application architectures
    • Monolithic (before 2000): Single unit of code, sharing same resources and memory.
    • Tiers and Layers (Around 2000s): Separates the application into different layers/tiers, with each layer performing a specific function (presentation, business, data)
    • Service Oriented Architecture (Early 2000s): build distributed systems using web services. This architecture is based on the idea of breaking down an application into smaller, reusable services that can be combined to create more complex applications
    • Microservices (Mid 2010s):is an evolution of SOA that emerged in the mid-2010s. This architecture breaks down an application into a collection of small, independent services that communicate with each other using APIs.

Web service

  • Web service definitions:
    • software functionality that can be invoked through the internet using common protocols.
    • a server running on a computer device, listening for requests at a particular port over a network, serving web documents
  • Done by contacting a program on a web server
    • Web services can be written in a variety of languages
    • Many web services accept parameters and produce results
    • Clients contact the server through the browser using XML over HTTP and/or AJAX Fetch code
    • The service’s output might be HTML but could be text, XML, JSON, or other content

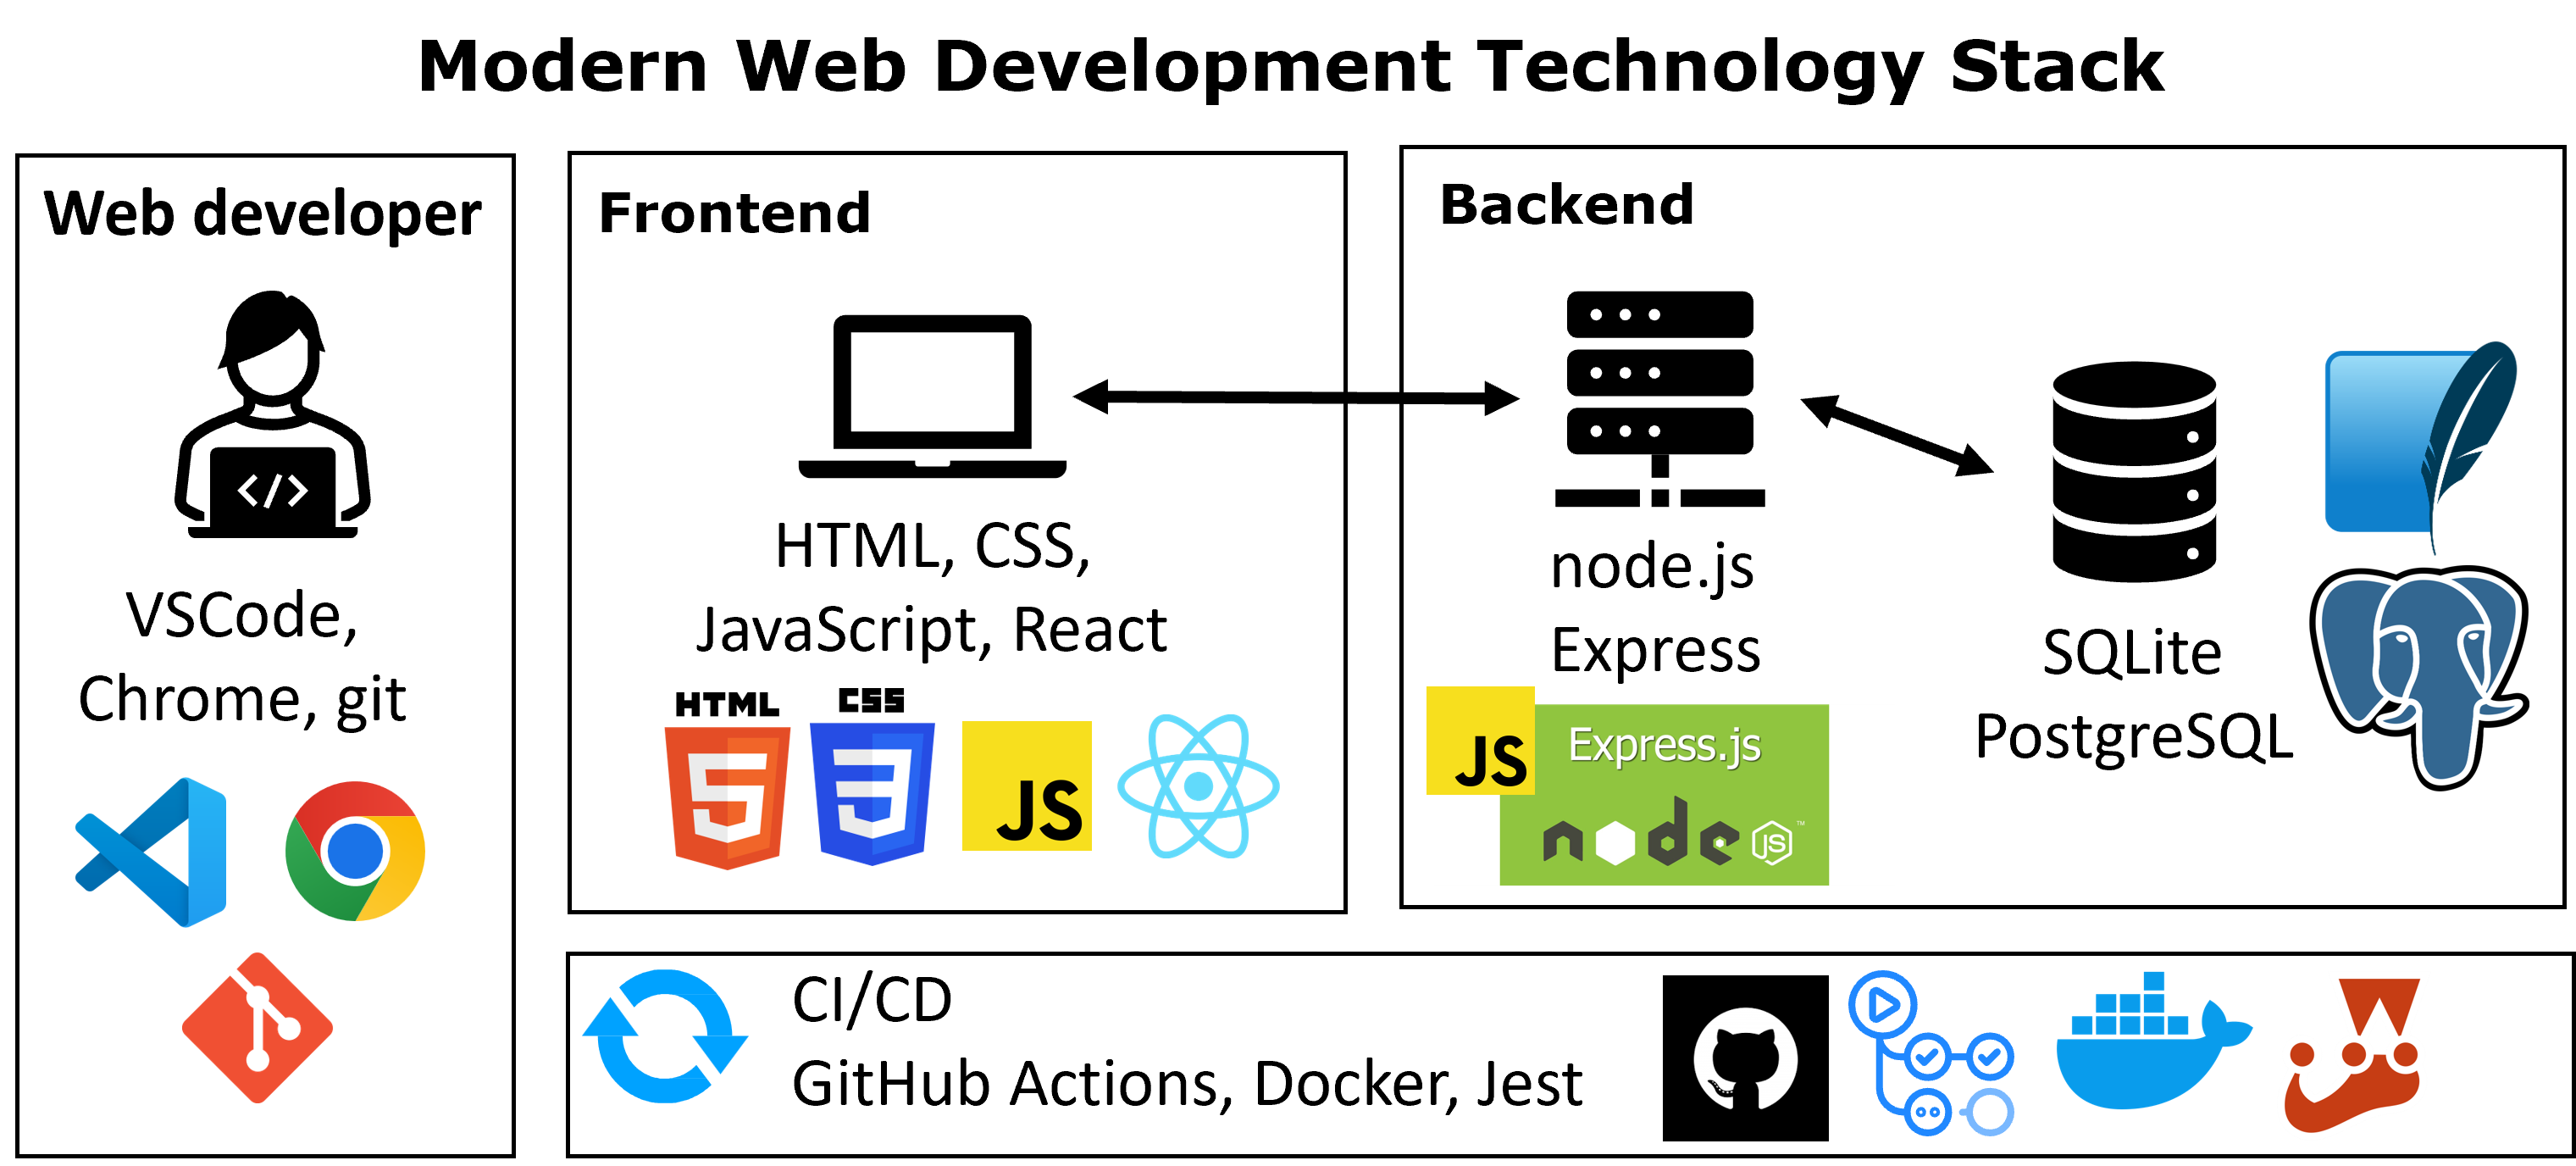
How does a web service respond to requests>

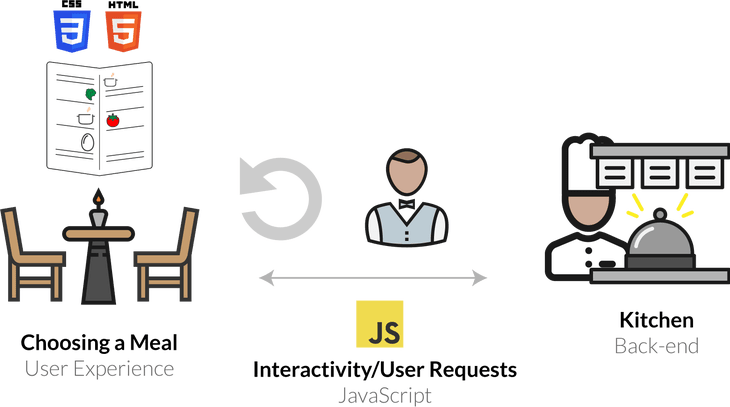
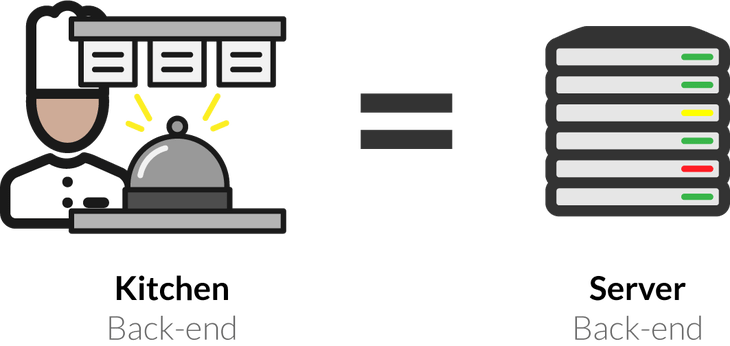
Why do we need a server to handle web service requests?

  • Servers are dedicated computers for processing data efficiently and delegating requests sent from many clients (often at once).
  • These tasks are not possible (or appropriate) in the client’s browser.
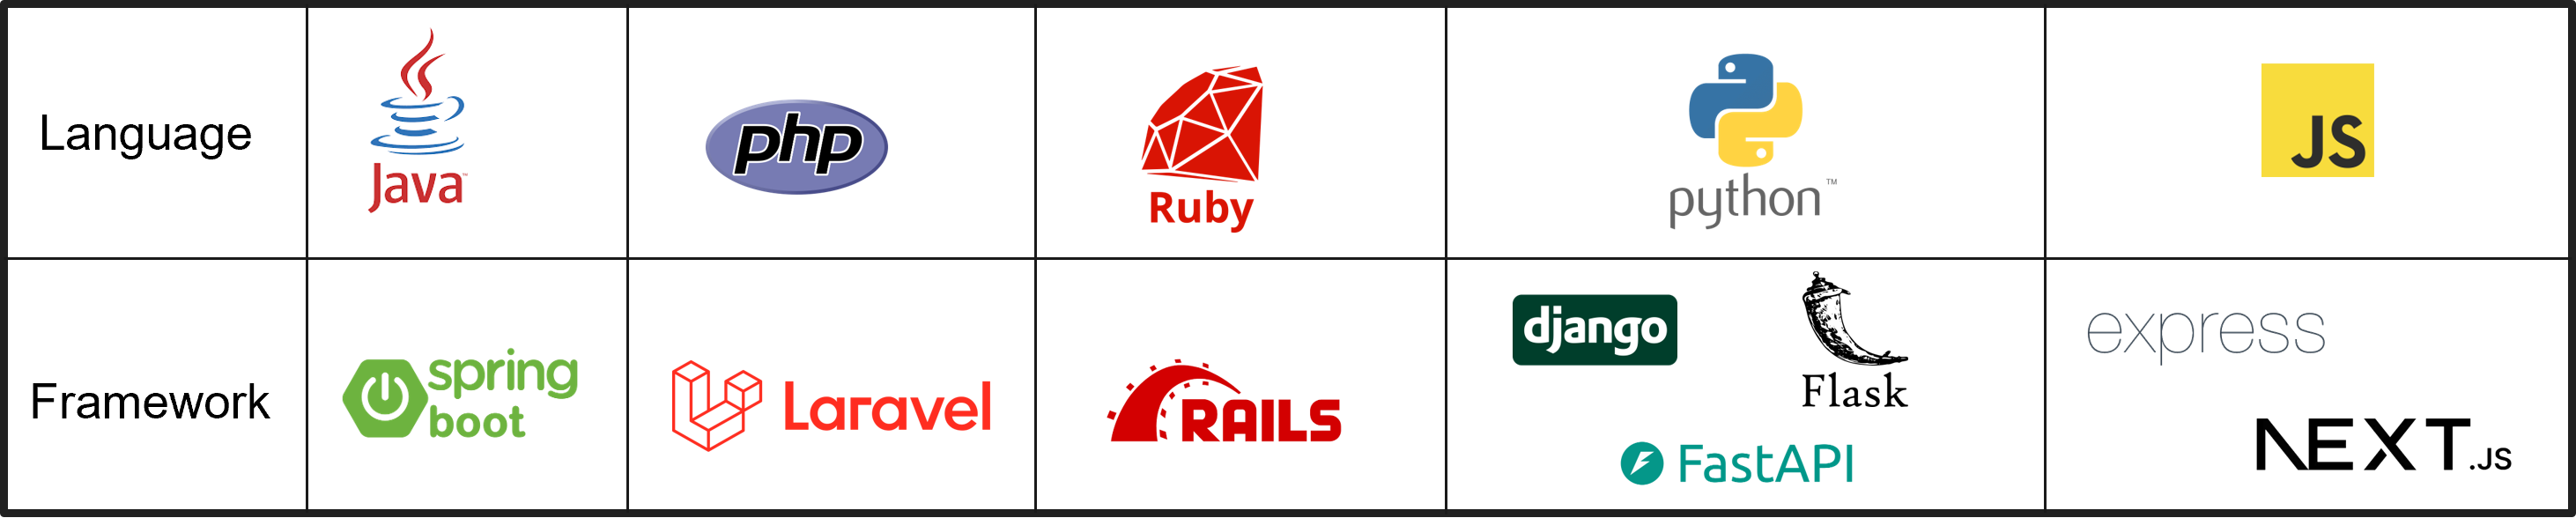
Server-side web frameworks

  • Server-side web frameworks (a.k.a. “web application frameworks”) are software frameworks that make it easier to write, maintain and scale web applications by providing tools and libraries that simplify common web development tasks
    • Work directly with HTTP requests and responses: Handle HTTP requests and responses without dealing with low-level networking code.
    • Route requests to the appropirate handler: Map URL patterns to specific handler functions for organized and maintainable code.
    • Make it easy to access data in the request: Provide easy access to request data like URL parameters, POST data, cookies, and session info through built-in objects.
    • Abstract and simplify database access: Simplify database operations with built-in Object-Relational Mappers (ORMs).
    • Rendering data: Generate dynamic content using templates and easily render data as HTML, JSON, or XML.
    • Supporting sessions and user authorization

Client-side JavaScript

  • So far, we have used JS on the browser (client) to add interactivity to our web pages
  • “Under the hood”, your browser requests the JS (and other files) from a URL resource, loads the text file of the JS, and interprets it realtime in order to define how the web page behaves.
  • In Chrome, it does this using the V8 JavaScript engine, which is an open-source JS interpreter made by Google.
    • Other browsers have different JS engines (e.g. Firefox uses SpiderMonkey).
  • Besides the standard JS language features, you also have access to the DOM when running JS on the browser - this includes the window and document

Server-side language: JavaScript node

  • Node.js is a lightweight and fast runtime based on the V8 JavaScript engine (same engine that powers Google Chrome and Microsoft Edge).
  • cross-platform, which means that we can run it on any operating system and architecture available in the modern market
  • Flourishing package ecosystem
  • Designed for efficient, asynchronous server-side programming
  • Open-source with a big and active developer community
    • The Node.js Foundation merged with the JS Foundation in 2019 to create the OpenJS Foundation
    • Google, IBM, Microsoft, Netflix, Red Hat, GitHub

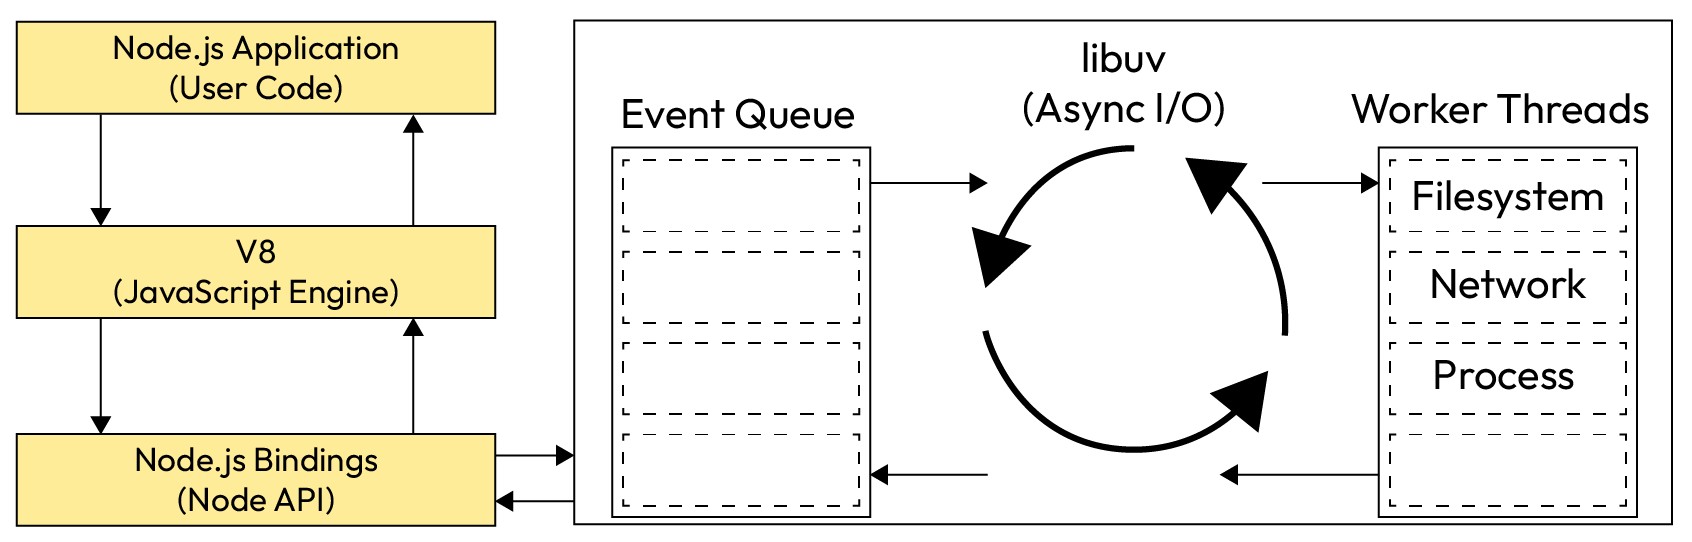
The Node.js single-thread architecture & Non-blocking I/O

  • Uses a single-threaded, non-blocking I/O model for efficiency and scalability.
  • Replaces traditional multi-threading with event-driven architecture using a central event loop.
  • Built on V8 engine (executes JS) and libuv (handles async I/O via thread pool).
  • Key components:
    • JavaScript code: Your app logic
    • V8: Runs your JS
    • Node APIs + C++ bindings: Interface between JS and system-level code
    • libuv: Manages async operations (file access, networking)

Node.js: Server-side JavaScript

  • Node.js uses the same open-source V8 JavaScript engine as Chrome
  • Node.js is a runtime environment for running JS programs using the same core language features, but outside of the browser.
  • When using Node, you do not have access to the browser objects/functions (e.g. document, window, addEventListener, DOM nodes).
  • Instead, you have access to functionality for managing HTTP requests, file I/O, and database interaction.
  • This functionality is key to building REST APIs!

Client-side vs. Server-side JavaScript

Client-side

  • Adheres (mostly) to the ECMAScript standards
  • Parsed and run by a browser and therefore has access to document, window, and more
  • Calls APIs using fetch, which sends HTTP requests to a server
  • Runs only while the web page is open
  • Handles “events” like users clicking on a button

Server-side

  • Adheres (mostly) to the ECMAScript standards
  • Parsed and run by Node.js and therefore has access to File I/O, databases, and more
  • Handles requests from clients, sending HTTP responses back
  • Runs as long as Node is running and listening
  • Handles HTTP requests (GET/POST etc)

Getting started with Node.js

  • When you have Node installed, you can run it immediately in the command line.
  1. Start an interactive REPL with node (no arguments). This REPL is much like the Chrome browser’s JS console tab.
  • “REPL” stands for “Read Evaluate Print Loop”.
  • It is a simple interactive computer programming environment that takes single user inputs, executes them, and returns the result to the user.
  • REPL-style tools exist in most languages.
  1. Execute a JS program in the current directory with node file.js

Starting a Node.js Project

  • There are a few steps to starting a Node.js application, but luckily most projects will follow the same structure.
  • When using Node.js, you will mostly be using the command line
  1. Start a new project directory (e.g. intro-node)
  2. Create your app.js file in your project directory
  3. Inside the directory, run npm init to initialize a package.json configuration file (you can keep pressing Enter to use defaults)
  4. Install any modules with npm install <package-name>
  5. Write your Node.js file! (e.g. app.js)
  6. Include any front-end files in a public directory within the project.
  • Along the way, a tool called npm will help install and manage packages that are useful in your Node app.

Starting app.js

  • Run npm install express to install the Express.js package
  • Build your baisc app with the following file
const express = require('express');
const app = express();

const PORT = 8080;

app.get('/posts', function (req, res) {
  console.log("Endpoint /posts received a GET request.");
  res.type("text").send("Hello World");
});

app.listen(8080, () => {
    console.log(`Our first node app listening on port ${PORT}`);
});

Important

package.json: This file is primarily used for managing and documenting metadata about the project, including its name, version, author, dependencies, scripts, and other configuration details. It acts as a manifest for the project.

package-lock.json: This file is generated and updated automatically by npm when installing or updating packages. It is used to lock the exact versions of dependencies installed in the project, ensuring reproducibility and consistent installations across different environments.

Node.js modules

  • When you run a .js file using Node.js, you have access to default functions in JS (e.g. console.log)
  • In order to get functionality like file I/O or handling network requests, you need to import that functionality from modules - this is similar to the import keyword you have used in Java or Python.
  • In Node.js, you do this by using the require() function, passing the string name of the module you want to import.
  • For example, the module we’ll use to respond to HTTP requests in Node.js is called express. You can import it like this:
const express = require("express");

Quick reminder on const Keyword

  • Using const to declare a variable inside of JS just means that you can never change what that variable references.
  • We’ve used this to represent “program constants” indicated by ALL_UPPERCASE naming conventions
  • For example, the following code would not work:
const specialNumber = 1;
specialNumber = 2; // TypeError: Assignment to constant variable.
  • When we store modules in Node programs, it is conventional to use const instead of let to avoid accidentally overwriting the module.
  • Unlike the program constants we define with const (e.g. BASE_URL), we use camelCase naming instead of ALL_CAPS.

app.listen()

  • To start the localhost server to run your Express app, you need to specify a port to listen to.
  • The express app object has a function app.listen which takes a port number and optional callback function
  • At the bottom of your app.js, add the following code - (process.env.PORT is needed to use the default port when hosted on an actual server)
// Allows us to change the port easily by setting an environment variable
const PORT = process.env.PORT || 8080; 
app.listen(PORT);

Note

Localhost is a hostname that refers to the current computer used to access it. - A hostname is a label assigned to device connected to a computer network - The name localhost is reserved for loopback purposes

Basic Routing in Express

  • Routes are used to define endpoints in your web service
  • Express supports different HTTP requests - we will learn GET and POST
  • Express will try to match routes in the order they are defined in your code
  • app.get allows us to create a GET endpoint.
  • It takes two arguments: The endpoint URL path, and a callback function for modifying/sending the response.
app.get(path, (req, res) => {
  ...
});

Adding Routes in Express.js (I)

app.get(path, (req, res) => {
  ...
});
  • req is the request object, and holds items like the request parameters.
  • res is the response object, and has methods to send data to the client.
  • res.set(...) sets header data, like “content-type”.
    • Always set either “text/plain” or “application/json” with your response.
  • res.send(response) returns the response as HTML text to the client.
  • res.json(response) does the same, but with a JSON object.
  • When adding a route to the path, you will retrieve information from the request, and send back a response using res (e.g. setting the status code, content-type, etc.)
  • If the visited endpoint has no matching route in your Express app, the response will be a 404 (resource not found)

Useful Request Properties/Methods

Name Description
req.params Endpoint “path” parameters from the request
req.query Query parameters from the request

Useful Response Properties/Methods

Name Description
res.write(data) Writes data in the response without ending the communication
res.send() Sends information back (default text with HTML content type)
res.json() Sends information back as JSON content type
res.set() Sets header information, such as “Content-type”
res.type() A convenience function to set content type (e.g., "text" or "json")
res.status() Sets the response status code
res.sendStatus() Sets the response status code with the default status text

Setting the Content Type

  • By default, the content type of a response is HTML - we will only be sending plain text or JSON responses though in our web services
  • You can uses res.type(“text”) and res.type(“json”)which is used to set response header content type information
app.get('/hello', function (req, res) {
  // res.set("Content-Type", "text/plain");
  res.type("text"); // same as above
  res.send('Hello World 2!');
});

app.get('/hello-json', function (req, res) {
  // res.set("Content-Type", "application/json");
  res.type("json");
  res.send({ "msg" : "Hello world with json!" });
  // can also do res.json({ "msg" : "Hello world!"});
  // which also sets the content type to application/json

});

Request Parameters: Path Parameters

  • Act as wildcards in routes, letting a user pass in “variables” to an endpoint
  • Define a route parameter with :param
Route path: /majors/:major/courses/:course
Request URL: http://localhost:8080/majors/ITM/courses/WebProg
req.params: { "major": "ITM", "course": "WebProg" }
  • These are attached to the request object and can be accessed with req.params
app.get("/majors/:major/courses/:course", function (req, res) {
    res.type("text");
    res.send("You sent a request for the major " + req.params.major +
        ", for the course " + req.params.course);
});

Request Parameters: Query Parameters

  • You can also use query parameters in Express using the req.query object, though they are more useful for optional parameters.
Route path: /courseInfo
Request URL: http://localhost:8080/courseInfo?major=ITM&course=WebProg
req.query: { "major": "ITM", "course": "WebProg" }

app.get("/courseInfo", function (req, res) {
  let major = req.query.major; // ITM
  let course = req.query.course;   // WebProg
  // do something with variables in the response
});
  • Unlike path parameters, these are not included in the path string (which are matched using Express routes) and we can’t be certain that the accessed query key exists.
  • If the route requires the parameter but is missing, you should send an error to the client in the response.

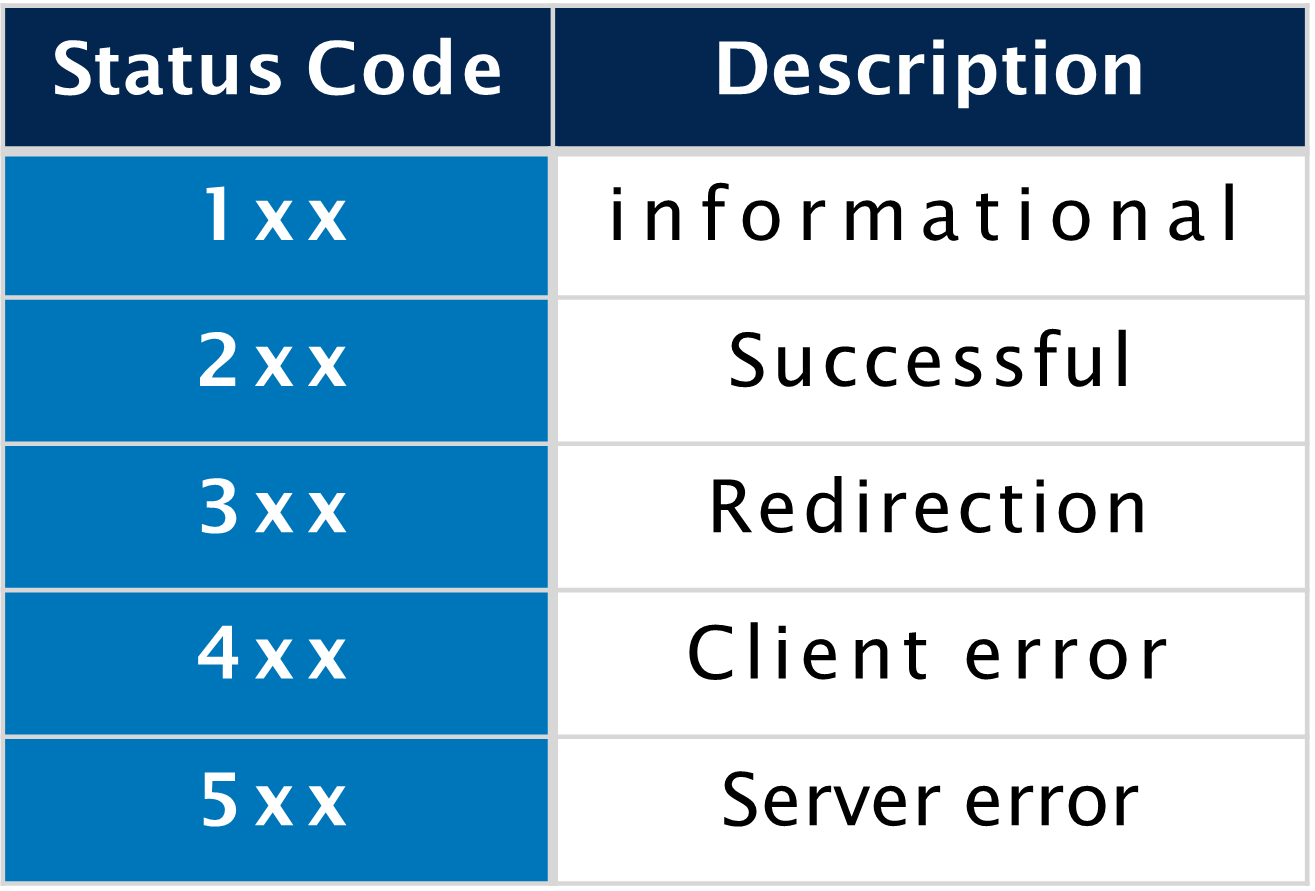
Choosing Error Codes

  • Use 400 (Invalid Requests) for client-specific errors.
    • Invalid parameter format (e.g. “Seattle” instead of a required 5-digit zipcode)
    • Missing a required query parameter
    • Requesting an item that doesn’t exist
  • Use 500 (Server error) status codes for errors that are independent of any client input.
    • Errors caught in Node modules that are not related to any request parameters
    • SQL Database connection errors (next week!)
    • Other mysterious server errors…

Setting Errors

  • The Response object has a status function which takes a status code as an argument.
  • A helpful message should always be sent with the error.
app.get("/cityInfo", function (req, res) {
  let state = req.query.state;
  let city = req.query.city;
  if (!(state && city)) {
    res.status(400).send("Error: Missing required city and state query parameters.");
  } else {
    res.send("You sent a request for " + city + ", " + state);
  }
});

Next week

  • More on Node.js

Acknowledgements


Back to title slide Back to lecture slides index