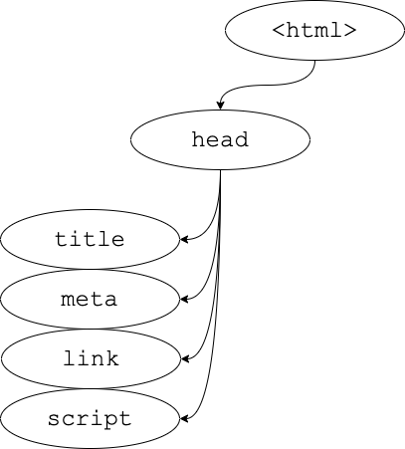
The <script> tag should be placed in the HTML page’s <head>. All JS code used in the page should be stored in a separate .js file
JS code can be placed directly in the HTML file’s body or head (like CSS), but this is poor code quality. You should always separate content, presentation, and behavior by keeping these “concerns” in separate files!!
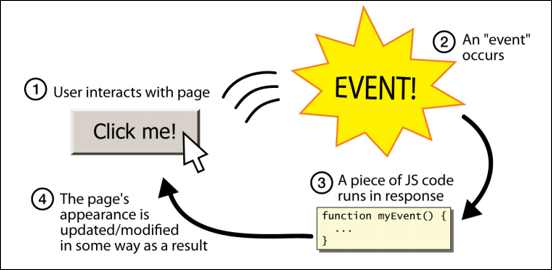
Event-driven programming
Unlike Java programs, JS programs have no main; they respond to user actions called events
Event-Driven Programming: writing programs driven by user events
Event handling
We can use JavaScript to attach functions to elements when an event (e.g. “click”) occurs.
To do so, we need to:
Identify the source element to listen for an event
Indicate the event to trigger a response
Specify the response function(s) to call when the event is triggered.
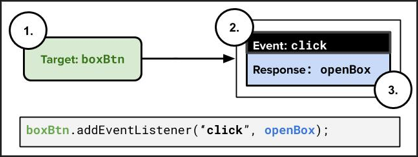
Once we have this information, we can use addEventListener to hook everything up!
Identify Source Element
Select the DOM elements to which we will attach event listeners.
The Document1 interface represents any web page loaded in the browser and serves as an entry point into the web page’s content, which is the DOM tree
We can access and manipulate the DOM through the Document instance of an HTML page
document is the actual object for your HTML page loaded in browser. This is a DOM object.
DOMContentLoaded event fires when the document has been completely loaded and parsed, without waiting for stylesheets, images, and subframes to finish loading.
The window load event is also used for this, it fires when the resources have successfully loaded.
getElementById, querySelector and querySelectorAll instance methods are used to access elements on the DOM
Accessing an element by id
let name =document.getElementById("id");
document.getElementById() returns the DOM object for an element with a given id (note that you omit the # when giving an id)
If the id does not exist, there is no error. Instead the returned value is null
Accessing a single node using querySelector
let name =document.querySelector(selector)
document.querySelector() returns only the first element that would be matched by the given CSS selector string
If no element matches the passed selector, there is no error. Instead the returned value is null
Accessing a collection of nodes using querySelectorAll
let name =document.querySelectorAll(selector)
document.querySelectorAll() returns all elements that would be matched by the given CSS selector string
If no element matches the passed selector, there is no error. Instead an **empty NodeList** is returned.
Handy shortcut functions
It’s handy to declare a shortcut to help us out as we will use these methods A LOT.
You may use the following in your JS programs (these are exceptions to the rule of having descriptive function names):
Attach handling functions to the selected elements so that they are triggered when the corresponding events occur
Listening & Responding to Events
// attaching a named functionelement.addEventListener("click", handleFunction);functionhandleFunction(e) {// event handler code// parameter e is optional and captures// more information about the event}
After adding an eventListener we can remove it so that the behavior associated with the event is no longer triggered.
You cannot remove anonymous functions, since you don’t have a name to refer to them
Calling removeEventListener() with arguments that do not identify any currently registered event listener on the EventTarget has no effect.
Define the response functions
Create functions that handle the desired behavior when an event occurs, usually manipulating the DOM
What’s inside a DOM Node?
<img src="images/duck.png" alt="A useful rubber duck photo"><p>picture taken from google</p>
For starters, the HTML attributes. This HTML above is a DOM object
Let’s assume a variable for the tag called myImg is properly defined) with these two properties:
myImg.src – set by the browser to images/duck.png
myImg.alt – set by the browser to “A useful rubber duck photo”
Let’s assume a variable for the <p> tag called para is properly defined) with this property
para.textContent – set by the browser to “picture taken from google”
Manipulating DOM elements
Most JS code manipulates elements on an HTML page
We can examine elements’ state
e.g. see whether a box is checked
We can change the state of elements
e.g. insert some new text into a div
We can change the style of an element
e.g. make a paragraph red
Listening to load events
You can only access document element after the window “load” event has fired
You can also access the DOM after the document DOMContentLoaded event has fired
without waiting for stylesheets, images, and subframes to finish loading
window.addEventListener("load", init);//ordocument.addEventListener("DOMContentLoaded", init);// no access to the document herefunctioninit() {// we now have access to the DOM tree!// set up your initial document event handlers here.}
Modifying DOM elements
We can modify HTML element properties and style
DOM Element
<p id="text"> This is the original text.</p>
JS
document.getElementById("text").textContent="Text has been changed!";document.querySelector("#text").style.backgroundColor="lightblue";
Creating DOM elements
For creating a new DOM element, we use the document.createElement("tag") function which creates and returns a new empty DOM node representing an element of that type
// create a new <h2> nodelet newHeading =document.createElement("h2");newHeading.textContent="This is a new heading!";
Important
Merely creating an element does not add it to the page
You must add the new element as a child of an existing element on the page.
Adding and Moving Nodes on the DOM
When you have a parent DOM node, you can add or remove a child DOM node using the following functions:
Name
Description
parent.appendChild(node)
Places the given node at the end of this node’s child list
parent.insertBefore(new, old)
Places the given node in this node’s child list just before the old child
parent.replaceChild(new, old)
Replaces the given child with new nodes
parent.insertAdjacentElement(location, new)
Inserts a new element at the specified location
Example
let li =document.createElement("li");li.textContent="A list item!";id("my-list").appendChild(li);
Removing DOM elements
When you have a parent DOM node, you can remove a child DOM node using the following functions:
Name
Description
parent.removeChild(node)
Removes the given node from this node’s child list
node.remove()
Removes the node from the page
Example
document.querySelector(".list-element").remove();/* or */let li =document.querySelector(".list-element");li.parentElement.removeChild(li);
Hiding/Showing DOM elements
How can we hide an HTML element?
#my-img {display:none;}
In JS, it’s possible to modify the style properties of an element directly
let boxBtn =document.getElementById("box-btn");boxBtn.addEventListener("click", openBox);functionopenBox() {let box =document.getElementById("mystery-box");// 1. Get the box image box.src="star.png";// 2. Change the box image's src attribute!}
Next week
Asynchronous JavaScript, JSON and APIs
Acknowledgements
Some contents of this lecture are partially adapted from: